
Before the pandemic, I never would have thought that some basic supplies such as tissue paper would run out of stock. Until I went to the store during the pandemic and found the tissue paper shelves empty. This prompted me to head over to the hardware section and pick up a simple bidet to install on my regular toilet. And boy! I wish I had it earlier. Not only has it cut in half the bill for tissue paper but also improved significantly our toilet hygiene.
In this article, I share how to install a simple bidet on a regular toilet. The bidet has no heater or dryer so no electrical works are needed.
How to install a simple bidet

Tools and supplies
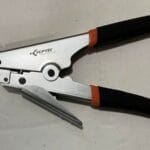
- A pair of water pump pliers
- Flat screwdriver
- Bidet kit (I prefer the Luxe Bidet Neo 120)
- Sponge or rug
- Catch can
Instructions
Phase 1: Attaching the bidet
- Turn off the water supply to the toilet. You can shut off the water supply valve at the base of the toilet or turn off the main supply to the house.
- Flush the toilet to drain any water from the reservoir tank.
- Absorb the remaining water in the toilet tank with the sponge or rug.
- Remove the toilet seat. Begin by popping up the tabs to access the toilet seat mounting screws. Then, holding the retaining nut underneath with one hand, unscrew the mounting screw with a screwdriver and remove the seat.
- Insert the adjustment plates in to the bidet assembly and place the entire assembly onto the toilet. Then spin the bidet adjustment plates to align their slots with the toilet seat mounting screw holes on the toilet.
- Reinstall the toilet seat and secure it with mounting screws and retaining nuts underneath. Simply place the toilet seat on top of the bidet assembly and insert the mounting screws so that they come through the bottom of the toilet. Then thread in the retaining nuts until they are snug to secure the whole assembly.
If your toilet seat is an old model like mine, you will notice that it floats in the air a little bit when you are not sitting on it or when the lid is not closed. If that bothers you, you might want to try a different type of seat that will accommodate the bidet addon better. Alternatively, you can put a 2″ spacer between the seat and the toilet but that might keep your feet off the ground if you are short.

Phase 2: Connecting water to the bidet installation
1. Install the T-adapter

Install the plastic or metallic T-adapter that comes with the bidet assembly onto the toilet fill valve body. Start by removing the supply line nut from the fill valve assembly. Use your adjustable pliers to break loose the nut. Then thread the metal T-adapter onto the fill valve assembly. Snug it with pliers and make sure the outlet on the adapter is facing the same direction as the toilet bowl. Remember to insert the rubber gasket in the T-adapter before threading it onto the fill valve body.
2. Re-attach the water supply line
Connect the water supply line to the fill valve assembly via the T-adapter. Begin by wrapping the threads of the T-adapter with Teflon or your favorite thread tape. The tape will ensure a tight seal when you attach the supply line. Then attach the water supply line onto the tee adapter and turn it by hand until it is nice and tight. You can also use your pair of channel locks but be careful not to overtighten or cross-thread.
3. Attach the braided hose that came with the bidet assembly.

Install one side of the small braided hose onto the side of the bidet control module and the other on the T-adapter outlet. Apply some thread tape to ensure a tight seal. Also, use water pump pliers to tighten the hose.
If your home inlet pressure is so high, you might want to install a pressure regulator in line with the bidet supply line. A pressure regulator will help the bidet control module regulate water pressure to your bum better. Also, the bidet will last longer.
Turn ON the supply line and test the bidet. Also, check the tank to ensure water refills properly. If the toilet tank has a problem refilling, check out this article on how to troubleshoot it.
Well, that is how to install a bidet on a regular toilet. A bidet is a good way to not only cut the tissue paper cost but also have a less abrasive experience in the toilet. The good thing is that to install it you do not need a plumber. Just the unit, a pair of adjustable pliers, and a flat screwdriver.