
Water should only flow out of the toilet tank when you flush the toilet. But when it flows constantly after flushing or flows throughout, you know there is a problem. In this article I show you how to troubleshoot and fix a toilet that won’t stop running with simple tools. You will need a pair of pliers, a large screwdriver, and a few replacement parts.
A toilet tank not filling or a toilet running all the time are common problems with flush toilets. The surprising thing is that the fix is so easy that you do not need to call the plumber. Just basic tools and a little knowledge of what to fix could save you big money.
Table of Content
What are the common causes of a running toilet?
The first step to stopping a running toilet is to figure out the cause of the problem. In that regard, two things should come to mind whenever you notice that water flows out of the toilet tank continuously. 1) Either the fill valve is not working properly or 2) the toilet flapper is leaking.
Toilet fill valve problem and how to fix it
A toilet fill valve is the part of the toilet that refills the tank after flushing. It is found inside the tank. If the fill valve malfunctions, water will run into the toilet tank without stopping. You will know that this is the problem with your toilet if water flows constantly through the overflow tube.
Two main reasons why the fill valve may fail to shut off water after you flush the toilet are: 1) a poorly configured float cup or ball, 2) a failing fill valve. Here is how to easily troubleshoot and fix it.
Step 1: Remove the toilet tank cover
Carefully lift off the toilet lid and place it aside. If it is a porcelain cover, place it safely to avoid breaking.
Step 2: Inspect the toilet fill valve and float
Locate the toilet fill valve and lift the float cup by hand and see if water stops running out of the tank. If it stops, you need to adjust the float.

Simply grab the screwdriver and turn the float adjustment screw on the fill valve counterclockwise to lower the float and subsequently the water level. Ideally, the water level in the toilet tank should be at least 1 inch below the top of the overflow tube. So, adjust until the water level drop to avoid overfilling of the tank. This should fix the constant water flow problem.
If the problem persists, probably some parts of the fill valve are faulty causing the whole valve system not to shutoff. You can choose to replace the faulty parts of the fill valve but that is best done by a plumber. What you can do by yourself, however, is replace the entire toilet fill valve system. This is how to do it.
How to replace a toilet fill valve

Tools and supplies needed
- Adjustable pliers (check out my favorite adjustable pliers)
- Replacement fill valve
- Sponge
- Basin
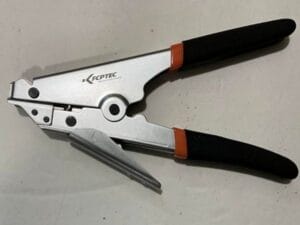
- side cutters
I. Shut off the water supply
The first step before trying to fix a leaking toilet tank is to turn off the water supply stop valve. Locate the water supply stop valve behind the toilet tank and turn it off. If your toilet does not have a shutoff valve, turn off the water at the mains water supply.
II. Drain water from the toilet tank
Flush the toilet to remove as much water as possible from the toilet tank. Then use a sponge to soak all the remaining water from the tank. Squeeze the sponge to drain the water into the basin and soak more water from the tank until it is dry. You may have to repeat this a couple of times.
III. Disconnect the water supply line
Find the supply line nut at the bottom of the tank and disconnect it. The supply line connects to the fill valve system from the bottom.
Try to remove the nut by hand but if it is too tight, use the adjustable pliers. Now the fill valve system is disconnected from water supply.
IV. Remove the fill valve retaining nut.

After removing the water line, you are left with the bottom part of the toilet fill valve sticking out from beneath. The valve body is secured in place by a retaining nut. To remove the lock nut, simply break it loose with the adjustable pliers and remove by hand.
V. Remove the refill tube
The refill tube attaches to the overflow tube. It pours water directly into the toilet through the overflow tube to replenish the water seal on the toilet bowl. Remove it by simply pulling it out of the overflow pipe. If the pipe is held in place by a clip, simply unhook the clip.
VI. Remove the toilet fill valve
Lift the old toilet fill valve system from the toilet tank and place aside. Wipe the toilet tank with a wet sponge to remove any sediments and debris from the bottom. Make sure you wipe well the hole on the tank where the new fill valve will sit.
VII. Install the new toilet fill valve assembly

Start by installing the cone-shaped rubber washer onto the bottom of the fill valve assembly. The cone-shaped side should face down. Then adjust the height of fill valve assembly by twisting the bottom counterclockwise by one hand while the other grabs the top firmly.
Now position the fill valve assembly into the hole on the tank and secure it in place with a locking nut from beneath. If the retaining nut has wings, you can tighten by hand. Otherwise, use adjustable pliers but be careful not to over tighten.
Ensure the fill valve system does not come in the way of the plunger and that the refill port faces the overflow tube. Also, the top of the fill valve should be 3 inches higher than the overflow.
VIII. Attach the fill valve tube
Once the fill valve assembly is anchored properly into the toilet tank, attach the refill tube onto the overflow. Simply clip it in place.
IX. Reconnect the water supply line
Attach the water line to the bottom of the fill valve assembly and and secure it in place with the water line nut. Just hand tighten the nut. You do not need to use pliers here.
X. Turn on the water to test new the fill valve
Turn ON the water shutoff valve and let water flow into the tank. Ensure that the water level is about 1 inch below the top of the overflow tank. If it is above that mark, turn the fill valve screw counterclockwise to adjust down the float cup. If it is way below the mark, turn the screw clockwise to adjust up the float. Use a screwdriver to turn the screw.
Toilet flapper problems and how to fix
If the toilet continues to run without stopping even after replacing the fill valve assembly, the toilet flapper could be the problem. Either the flapper is not closing all the way down or it is not sealing properly. A worn flapper could also cause the toilet tank to leak into the bowl.
Toilet flapper does not close all the way?
If the flapper wont close all the way down, it could be due to a short flapper chain. To fix this, adjust the length of the chain and add some slack and make sure the flapper closes completely when you release the plunger.
Also, check that the chain is not kinked. Sometimes the chain may kink and cause the flapper not to close all the way.
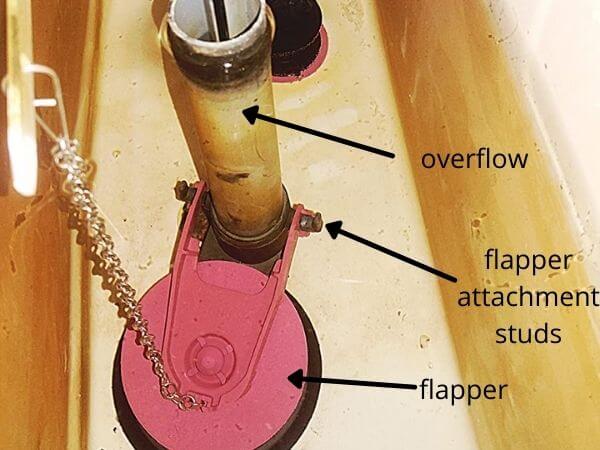
If the flapper gets stuck, remove it and clean the studs onto which it hooks. Sediments could have gathered around the studs preventing the flapper from moving smoothly.
If the toilet flapper leak is due to the flapper valve not sealing properly, clean it. Clean the flush valve where the flapper sits as well to remove any debris. Also, ensure the flush valve gasket is smooth enough to create a tight seal.
If none of these hacks work or water continues to flows intermittently but does not flow into the overflow, replace the flapper. This is how to do it.
How to replace a toilet flapper

- Shut off water supply into the tank
- Flush the toilet tank reservoir to remove as much water as possible
- Reach into the toilet tank and unhook the flapper from the side studs.
- Unhook the flapper chain from the flush lever
- Install the new toilet flapper valve. Follow steps 1 – 5 in reverse order.
- Ensure good slack on the chain and cut off the excess chain with side cutters.
- Turn on the water supply to fill the toilet tank and inspect if there is any more leak.
Wrap up
That’s how to troubleshoot a toilet that runs constantly. If the toilet continues to run without stopping or runs randomly even after replacing the fill valve and the flapper, call the plumber for help.