
After successfully replacing the gear and brake cables on your bike, you are now faced with one problem. How do you seal the cable ends to keep them from fraying? While you can choose to solder the ends with soldering iron or dip them in a tube of superglue, I would not recommend it as the first option. The reason is that although the two methods are effective and easy, the end product is not as appealing as you would want. That is why I prefer to terminate my bike cables with cable end caps because they make it stand out.
What are bicycle cable end caps?
Bike cable end caps or crimps are sleeves or ferrules that you place on the ends of the bicycle cable to hold the strands together and keep them from coming apart. You can use them to terminate the bike cable after cutting it or to repair frayed cables.
The caps come in different shapes and colors. Therefore you can use them to personalize your bike by installing your favorite colors. You can even color-match the caps with some parts on your bike to make it look cool. In other words, the colored end caps do more than sealing the ends of your bike cable. They add aesthetic beauty, which is the main reason I prefer to use cable end caps over alternative methods.
Specifically, I like the blue or mustard end crimps because they add a nice detail and accent to the blue rims of my bike. The colored end tips also make the bicycle look a little blingy, which is cool. Needless to say, a beautiful bike is eye candy to many and something worth leering at for the wannabe cyclists. Let’s not lie!

The end caps also bring some uniformity into how you terminate the ends of your bicycle cables. They ensure you don’t end up with some terminals that are bigger than others. I noticed that when soldering the ends, you might end up with some sharp spikes if you do not know how to solder properly. The sharp ends can become a safety hazard because they can catch your clothing as you hop onto the bicycle or cause injury. Thankfully, cable end ferrules eliminate such problems by creating nice housing for the twisted cable.
How to install bike cable end caps
To install bicycle end caps, you will need the following tools:
Tools and supplies
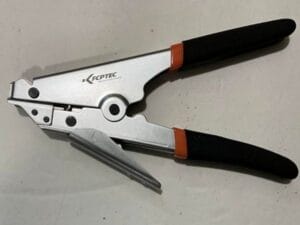
- Bike cable and cable housing cutter pliers
The bike cable and housing cutters are special types of pliers for cutting bicycle cables and cable housing cleanly. They have sharp quality cutters that cut tough brake and shifter cables cleanly without leaving. Some cable cutters have crimpers behind the pivot for crimping end caps. End caps help keep the cable from unravelling or disrupting the shifting or braking.
One of the best bicycle cable cutters with integrated crimper are the CN-10 cable and housing cutters. They cut straight and flush and squeeze end caps nice and tight in one squeeze. - Cable ferrrule end caps
You can use the plain silver end caps or go for the colorful caps. The colorful end caps add some nice detail to your bike. - Diagonal cutters or regular combination pliers (optional).
If your cable cutter does not have an integrated crimper, you could use a ferrule crimper or use cutters on regular pliers to press the end crimps.
Steps
Step 1: Install the new shifter or brake cable
Inspect the old bike cable and change it if it needs to be changed. Check out this video to learn how to replace a broken shifter or brake cable on your bike. If you just need to repair a frayed end, jump to step two.
Step 2: Cut the cable to size
After installing the new shifter or brake cable, cut it to length using cable cutter pliers. You could use side cutters to cut but unfortunately, they do not cut as cleanly as cable cutters. Side cutters are only good for cutting a single wire whereas cable cutters are perfect for cutting multiple wire strands.
Simply place the cable between the open jaws of the cable cutter and squeeze the handles to cut. This will leave a very clean cut.
If you are repairing a frayed bicycle cable, first spread the wires and clean them with fine stainless steel wire. Just make a few passes with steel wool to remove any dirt.
Then re-twist the strands with your hand. Start from where it is clamped to the rear derailleur or brake caliper to the tail end. To do this, grip the frayed cable in between your thumb and index finger and begin to twist in one direction about half a turn progressively to the end. You can check out this video to get an idea of how to retwist the unraveled bicycle cable.
After re-winding the cable, hold it tightly near the tip and cut off about half an inch from the end with your cable cutting pliers. This should leave a clean flush cut.
Step 3: Insert the cable end cap
While squeezing the freshly cut cable end between your fingers in one hand, pick the appropriate size end cap from your assortment and fit it on. If you are working on a new cable, you do not need to squeeze it because the wire strands are already intact.
Slide the end cap over the cable all the way while ensuring that no wire strand is left out.
Step 4: Crimp the end cap into place
To crimp the end sleeve, you can either use the integrated crimper on the bike cable cutter or the cutting edges of your regular pliers or diagonal pliers.
If you choose to crimp with the cable cutter integrated crimper, simply place the cable assembly between the crimping teeth behind the pivot and squeeze the handles. This will secure the end cap in place.
Alternatively, place the ferrule assembly between cutters of your regular pliers or diagonal pliers and squeeze lightly to crimp. Squeeze the end cap at two or three different positions to secure it firmly in place. However, be careful not to squeeze the handles too tight as that might cause the cutters to puncture the ferrule cap.
Step 5: Test the cable end cap
Lastly, do a pull test on the wire end cap to ensure it is firmly in place. If it comes off, you need to repeat the process more carefully.