
I like to use the right tool for the job all the time because it is the right thing to do. And this also applies to when I am removing cotter pins from a vehicle’s suspension. But that does not mean I cannot be creative when I do not have the correct tool at hand. That is why I wrote this article to share how I use pliers to remove cotter pins when I cannot find my cotter pin puller tool.
But before I dive right into how to remove the split cotter pins with pliers, let me first explain what a cotter pin is and where you will find it on a vehicle.
Table of Content
- What is a cotter pin?
- Cotter pins vs Safety wire
- How cotter pins work
- How to install cotter pins
- How to remove cotter pins
What is a cotter pin?
A cotter pin is a type of metal fastener for locking round fasteners to keep them from working loose. It keeps a nut from coming off, especially on suspension components such as ball joints.

Cotter pins are simply bent metal strips made from ductile metal, mainly mild steel. They are highly formable and don’t break easily.
Types of cotter pins
At a glance, cotter pins look like a straight hair clip. But there are those that look exactly like a beefier hair clip. They are known as hairpin cotters or R clips. They have one straight stem and the other is springy or curved.
R clips go over a shaft to lock it in place just like an external snap ring does. The main difference is that an R pin overhangs on the sides and is therefore not a direct substitute for snap rings. But they serve a similar purpose of keeping things on the shaft.

R type cotter pins are common on unthreaded shafts and studs. One of the most common places you will find them is on the trailer hitch pin. It keeps the hitch pin from coming off the trailer assembly. They are also common on studs used in lawn mower deck assembly.
Another type of cotter pin is the bow tie locking pin. It resembles an R clips but instead of having one straight stem, both of them are springy but one is looped at the end. However, you can use them interchangeably.
A typical split pin has an eye on one end and the other end is two split ends pressed together. When installing it, you put it through the hole and bend split ends to the opposite sides. If there is a cotter pin, you bend the ends over the cotter pin to keep it from moving.
Cotter pins vs safety wire
Cotter pins serve the same purpose as a safety wire. The difference is that a cotter pin only goes in one bolt or stud whereas a safety wire connects together more than one fastener.
Another key difference between cotter pins and lock wire is that lockwires secure bolts while cotter pins secure nuts. As such, a lock wire goes through a hole on the head of a bolt whereas a split cotter pin goes through a hole on the threaded shaft and wraps around a nut.
The third difference is that both fasteners require special types of tools to install or remove. Safety wire uses lock wire pliers or duckbills while cotter pins use a split pin puller, a pair of side cutters, or needle nose pliers.
How a cotter pin works
Unlike safety wire that goes through a hole on the head of a bolt, a split cotter pin goes through a hole on the threaded side of a bolt or stud to keep the nut from loosening. A cotter pin has a wide eye that keeps it from coming off through the other side of the hole. Once through the hole, you bend the tails of the pin to wrap them around the grooved nut to keep it from coming loose.
It is important to know that bolts and studs that accept cotter pins use castle nuts. These are special types of nuts with slots on one end. When installing them, you must align the slots with the bolt hole. This ensures that the eye of the split pin rests on the groove of the castle nut on one side while the tails wrap around the nut on the other end to lock it in place.

There are other cotter pins that only retain things on a shaft or stud to keep them from falling off. Such pins only go through the stud and don’t wrap around a cotter pin. The figure below shows an example of a cotter pin keeping the washer from coming off the stud.

How to install cotter pins
The correct way to install a split pin is to first tighten the castellated nut and align its slots with the hole on the screw or bolt.
Then put the cotter pin through the castle nut slot on one end so that the pintails come through the nut on the other end.
Lastly, split apart the tails and wrap them around the castellated nut on both sides. This will lock the nut in place to prevent vibration from loosening it up.
Cotter pins applications?
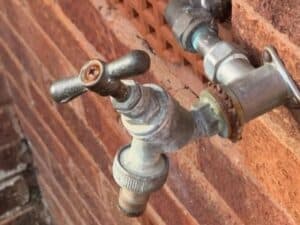
As I mentioned, cotter pins are quite common on a vehicle’s suspension system. You will find them on suspension components such as the upper and lower ball joints and tie rod ends. They help to lock the nuts and keep them from loosening. If you pay close attention, you will notice that ball joints have a hole on the end of the threaded stud and use slotted hex nuts instead of regular nuts.
You can also find cotter pins on a wheel assembly. They are used to lock the wheel bearing nut so that it won’t come loose when the wheel is spinning. These are quite common on the wheels of hand carts.
Another place you will find a cotter pin is on the trailer hitch. Specifically, you will find hairpin or bow-tie types because they can go over the groove of the hitch pin and lock it in place. R-type and bow-tie locking pins are very common on shafts and unthreaded shafts.

Lastly, if you like to make your own stuff, you may want to introduce a cotter pin on bolts and rotating shafts to lock things in place. The pins add an extra level of safety by ensuring that fasteners on critical equipment won’t come loose accidentally.
How to remove cotter pins
There are many ways to remove cotter pins but these three ways are the most effective.
1. How to remove cotter pins with cotter pin puller tool
R clips are easy to remove by hand because they have a large eye through which you can put your finger and pull. But split pins are quite small and stubborn and thus require a removal tool.
The best tool for removing cotter pins is a cotter pin puller tool but sometimes pliers do a better job. A cotter pin puller looks like a screwdriver with a sturdier shaft and a tapered end. The sharp end gets through the eye of a split pin and is slightly bent to provide leverage when prying out the pin.
To extract a split pin with a cotter pin puller, simply put the tapered end through the eye and use the bent side to leverage out the pin. If the split ends will not straighten up, you can use regular pliers to unbend them.
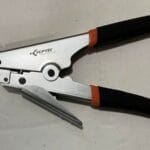
But when you do not have a cotter pin extractor tool at hand, you can use pliers. Personally, I like to use a pair of side cutters or diagonal cutters. They do a great job of removing stuck and stubborn cotter pins that even a cotter pin puller tool struggles to extract. Here is how I do it.
2. How to remove cotter pins with diagonal pliers
As I mentioned, diagonal cutters or side cutters are the best alternatives for removing cotter pins when you don’t have a cotter pin extractor tool. Sometimes they can even be better than a split pin puller tool. Dikes have sharp jaws that bite into the pin strongly and won’t let go until the pin is out.
The following are the steps to use them to remove a split pin. You may need a rubber mallet to hit the pliers so that you can create the extra force for pulling a stuck or rusty pin from the bolt hole.
Tools
- Rubber mallet (optional)
- Diagonal cutters
Steps
1. Grab onto the cotter pin head with side cutters
Bite the cotter pin with side cutters but do not squeeze the handles too tight to avoid snipping the pin. Just press the handles enough to ensure the jaws have a tight grip.
2. Hit the side cutter pliers with a hammer from the inside
While gripping the pin tightly, hit the dykes lightly with a rubber mallet from the inside. You should see the pin budge. Continue to tap it until the cotter pin is all out.
If the pin is stuck, you can spray a bit of PB blaster or WD40 to free up some rust and debris. Because of exposure to the environment, dirt and gunk tend to settle on a suspension cotter pin and seize it. So, spraying some penetrating oil on the cotter would come a long way in helping free it.
You can also try to unbend the tail of the pin if it does not straighten up when you tap on the pliers.
If you do not have a rubber hammer, you can use a plank of wood or anything that will not dimple the pliers or damage the hinge.
But if you are afraid that hitting your trusty pair of dikes will damage it, just grab the pin as close to the bolt hole as possible and pry the pliers to pull out the pin. After every little pull, change the gripping point and pry the pliers. Do this until the split pin comes off completely. Use the end bolt or stud to which the cotter pin is attached as pivot to leverage the pliers as your pry it.
3. How to remove cotter pins with needlenose pliers
When you don’t have a cotter pin puller or side cutters, you can use needle nose pliers to remove cotter pins. Follow these simple steps:
Steps
- Straighten up the cotter pin tails with the neednose pliers
- Grab the eye of the pin with the pliers and pull outward. Do this by putting one of the tapered jaws through the eye of the cotter pin and close the jaws to grip the pin tight before pulling.
- If the cotter pin does not come right off, you can straighten the ends some more as you pull.
Once the pin is out, you can use a wrench to uninstall the castle nut.
Wrap up
So, the next time you encounter a cotter pin in your repairs, do not let it intimidate you because you don’t have an extractor tool. Just grab your side cutters or needles nose and work the pin out. You will be surprised how the pliers do a nifty job of extracting the split pin.
Another type of pliers you can use to remove cotter pins is the Knipex extra slim cobra pliers. These are like regular cobra pliers with elongated slim jaws. The extra length on the jaws provides a better gripping capability for small objects even in tight spaces. This makes these slim cobra pliers a great option for pulling stubborn cotter pins. If you want to learn more about these extra slim knipex cobras, check this article: All about Knipex ES Cobra water pump pliers.