If you work in the military or are a motorsport mechanic or aircraft technician, you most likely have used safety wire to secure bolts on critical hardware assemblies. If you are not in any of those trades and have not come across a safety wired fastener, don’t worry. This article is for you. You will learn what is safety wire, how to use it, and in which projects to use it.
Table of Content
What is safety wire?

A safety wire is a type of stainless steel wire for locking nuts, bolts, and other fasteners to keep them from loosening due to vibration. It is are also called a lock wire or lockwire because of the locking function.
The process of applying a safety wire on a fastener or connector is called safety wiring or lock wiring. It involves connecting two or three fasteners together stainless steel safety tie wire. However, when there is only a single fastener, you can lock wire by connecting it to a designated anchor point.
When securing a fastener or object with safety wire, you can use a single strand or dual twisted strands. However, the latter offers more strength and is therefore ideal for applications that experience a high amount of force.
Besides locking fasteners, a safety wire also indicates that the fastener has been torqued to spec. So always ensure you torque the nuts and bolts before safety wiring them.
Safety lock wires are a crucial safety component especially in applications that produce high levels of vibration. They keep the fasteners intact and always in the torque you set them. This helps to prevent catastrophic mechanical failures. In other words, safety wires help to increase the safety of critical machine systems and equipment, hence the name.
For example, imagine how catastrophic it would be if the bolts of the airplane propellor came loose during a flight. Wouldn’t be fatal? But with a safety locking wire in place, the bolts would remain intact to keep the shaft from disengaging. That is how safety lock wires improve the safety of machine systems.
How does a safety wire work?
The working principle of safety wire is quite simple. The lock wire creates counteracting tension on a fastener to keep it from loosening or falling off due to vibration. In other words, a properly configured safety wire locks a fastener to keep it from turning either clockwise or counterclockwise. This keeps the fastener in the same torque you set it.
If you try to twist a safety wired fastener, you will notice that the twisting action only puts the lock wire in tension. This tension keeps the nut or bolt from turning significantly unless the torque is large enough to snap the wire.
How to install safety wire

There are three ways to install safety lock wire. You can install by hand, use regular needle nose pliers or duckbill pliers, or use special safety wire pliers.
How to install safety wire by hand
If you are lock wiring just a few fasteners, you can do it without a tool. However, you will need a pair of wire cutters to cut the lockwire to length.

Steps
Step 1: Select the appropriate size of lockwire. Typically, 0.032 inch safety wire is what you will need for many applications unless you are safety wiring small electricals.
Step 2: Cut enough length of lockwire. Typically 5 times the gap between the two fasteners you want to secure.
Step 3: Thread the end of the lockwire through the lock wire hole on the bolt or nut. Pull it through so that you have equal lengths on both sides.
Step 4: While stretching both strands with your hands, pull the strand on the left side over the bolt in the clockwise direction and pass it underneath the other strand.
Step 5: Stretch both strands apart at 180 degrees and make the first twist. Then hold them at 90 degrees apart and continue to twist while applying even tension on both strands.
Step 6: Twist the strands all the way to the lockwire hole of the second fastener. Ensure you get between 6 – 8 twists per inch.
Step 7: Feed one of the strands through the hole of the second fastener. Insert it from the left to right.
Step 8: Pull the second strand over the bolt in the counterclockwise direction and route it underneath the first strand. Make sure you apply enough tension on the wire to eliminate any slack.
Step 9: Stretch the two wire ends apart at 180 degrees and make the first twist. Then hold them at about 90 degrees apart and continue twisting. Make more than 8 twists per inch.
Step 10: Grab a pair of wire cutters and cut the double twisted wire at least 5 twists from the fastener.
Step 11: Use needle nose pliers to bend the end of the wire and form a pigtail. Then tuck the sharp end of the pigtail inside to keep it from grabbing or stabbing anyone.
Your fasteners are now locked. The locking wire should form a nice S-shape and should be fairly tight.
Unfortunately, safety wiring by hand does not apply enough tension to the locking wire. This makes installing safety wire by hand is not ideal for lock wiring critical parts. But it is a good way of securing non-critical parts to keep them from vibrating.
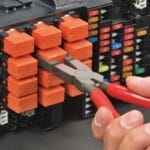
How to install safety wire using duckbill pliers or needle nose pliers
Duckbills are a type of flat nose pliers with fairy thin long jaws that resemble a ducks bill. They are perfect for gripping, bending, and twisting wire.
Duckbill pliers are very useful in assembly works. You can use the to twist safety wire on bolts or install cotter pins. In fact, another name for them is assembly pliers because of their exclusive use in assembly works. However, since duckbills do not have integrated cutters, they are used along with diagonal cutters.
The following are the steps for safety wiring with duckbill pliers. You will need two pairs.
Steps
- Select the right safety wire gauge for your safety wiring project. Refer to the table below for the proper selection of lock wire size.
- Cut enough length of lockwire. It should be at least 5 times the size of the gap between the fasteners you want to secure.
- Feed the lockwire through the lock wire hole on the first bolt from left to right.
- Pull the wire through the hole with your duckbills until you have equal size on both sides.
- Grip each end of the wire with a pair of duckbills
- Pull the strand on the left side over the bolt in a clockwise direction and cross it under the strand that is coming out of the bolt hole.
- Snap both ends of the tie wire to straighten it. This should remove any twists or kinks.
- Pull both ends apart at 180 degrees to each other and make the first twist.
- Bring the two strands together at about 90 degrees to each other and make more twists. Remember you are using pliers to grip both ends of the wire.
- Twist the strands together as you pull them towards the second bolt so that the wire has good tension. Twist until you get to the lockwire hole of the second bolt.
- Thread one of the stands through the bolt hole from left to right. Pull the other strand over the bolt in the counterclockwise direction and pass it under the first strand.
- Pull both ends in the opposite directions with your pliers and snap them to stretch and then make the first twist.
- Bring the strands closer to each other while pulling them towards you and begin to twist them together. Make more than 8 twists per inch
- Snip the twisted wire end at about 1 inch from the bolt.
- Bend the wire end with your duckbills or needle nose and tuck it in so that it does not become a hazard.
The duckbill pliers lock wire neater and more securely than doing it by hand. If you do not have duckbills, you can use long nose pliers.
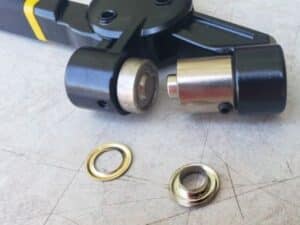
How to install lockwire with safety wire pliers

Safety wire pliers are a special tool for twisting lock wire automatically. The pliers have a barrel in between the handles that houses the wire twisting mechanism. The barrel has a small pull knob at the back for operating the twisting mechanism and a sleeve on the other end for locking the jaws.
When you squeeze the handles together tightly and pull the sleeve backward, it locks them in place. At the same time, the jaws lock onto the wire you want to twist. This allows you to release the handles and operate the twisting mechanism with one hand.
So, instead of manually rotating the pliers to braid the wire strands as you would with duckbill pliers, the pull knob at the back of the center stem lets you spin the pliers automatically. All you need to do is pull and retract the knob and the pliers will spin and twist the wires.
Some lockwire pliers are more advanced in that they have a reversible action feature. This feature lets you select the direction you want the pliers to rotate when you pull the knob. It is a very useful feature, especially you need to make both left and right twists such as when wire locking more than two bolts together. But generally, the twisting mechanism of safety wire twisters makes twisting safety wire so much easier. It takes away fatigue from your hand and wrist and increases efficiency.
Steps
Step 1: Prepare the lock wire
Cut sufficient length of lock wire. When looped over, the lockwire should be about twice the length of the distance between the fasteners you want to lock.
Be sure to select the appropriate lock wire gauge for the project. If you are not sure about the proper gauge, refer to the next section on selecting the right safety wire gauge. If you still are not sure, go with 0.032 lockwire. It is the safety wire gauge you will need in many of your projects.
Step 2: Thread the safety wire through the lockwire hole
Insert the wire end through the lock wire hole and pull it through until you have equal lengths on both sides of the fastener.
Step 3: Loop the left-hand side strand over the fastener
Loop the strand on the left side over the head of the fastener in a clockwise direction. Pass it underneath the strand that comes out through the hole and get both of them in the direction of the next fastener.
Step 4: Straighten the wire strands
While holding one strand by hand, grab the other one with pliers and squeeze the handles to clamp it tightly. Give it a good snap to straighten it out. Do the same for the other strand. This straightens out both strands and gets them in the direction you want them to go.
Step 5: Make the first twist
Make the initial twist by hand to ensure that the strand is tight enough on the fastener. Simply grip the wire strand that loops over the fastener with pliers and the other by hand. Pull the two wires towards the next fastener while maintaining a 90-degrees gap between them. Twist the strand in your hand over the strand you are gripping with pliers. This gets the twists started nice and tight to eliminate any slack around the fastener.
Step 6: Twist the wire strands with safety wire pliers
Take both wires and grip them in the jaws of the lock wire pliers. Grip where you want the twists to end, which should be right on the lockwire hole of the second fastener.
Squeeze the handles tight and slide the outer sleeve down with your thumb to lock the jaws onto the stock. Some wire twisting pliers have a spring-loaded latch pin. Just engage it to lock the jaws.
Release the pliers as you pull back on the knob. This will spin the spiral rod and will in turn cause the pliers to spin to twist the wire. Since lockwire pliers rotate both ways, ensure it spins in the clockwise direction. Also, to avoid undoing the twists, grab the pliers every time you release the pull knob.
Pull and release the knob a couple of times until you get the twists as tight as you want them to be. About 6 – 8 twists per inch are good for lock wiring.
Lastly, when you get the right pitch on the safety wire, squeeze the handles of the pliers together to release it. Squeezing the handles together unlocks the spring-loaded latch.
Step 7: Safety wire the second fastener
Thread one of the strands through the second fastener from left to right. Pull the other strand over the fastener in the counterclockwise direction and pass it underneath the first strand.
Repeat steps 5 and 6 but this time around, you should twist the wires in the counterclockwise direction. Ensure the twisting pliers rotates counterclockwise and keep from rotating in the other direction to avoid undoing the twists.
Since this is the last fastener, make between 8-10 twists per inch. Press the handles to release the dual-twisted wire.
Step 8: Terminate the lockwire strands.
Cut the dual twisted wire strands at about 10 twists from the initial twist. Then bend the pigtail under and inward using needle-nose pliers to avoid sharp projecting ends that might present a safety hazard.
How to select the right safety wire gauge for you project
Safety lock wire comes in different sizes for different applications. The choice depends on the anticipated force on the material. The higher the force the larger the wire needed. However, most applications are just fine with the 0.032 inches safety wire.
But to eliminate the guesswork in selecting the right size of lockwire, check the table below. It has details of the right size of safety wire for different lock wire holes. For example, safety wire holes between 0.45 inches and 0.62 inches in diameter require 0.020 inches lockwire if the fasteners are not more than 2 inches apart.
Common safety wire sizes
| Lock wire hole size | Distance between fasteners | Safety wire size |
|---|---|---|
| > 0.45 inches | > 2 inches | 0.032 inches |
| 0.45 – 0.62 inches | < 2 inches | 0.020 inches |
| 0.025 inches | ||
| 0.041 inches | ||
| 0.051 inches |
Safety wire uses
Safety wire has many uses across various industries. You can use it on both professional and DIY projects. In this section, I share some of the most common applications of safety lock wire.
Professional uses
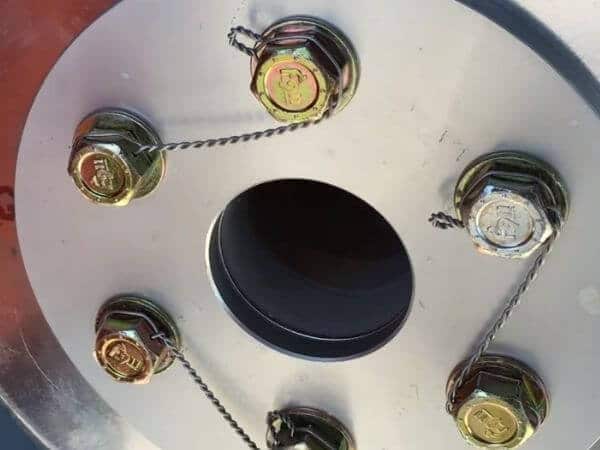
Aircraft safety wiring
The FAA Safety Briefing document states that aircraft components must be secured in place using one of three locking mechanisms to ensure safety in the skies. The locking mechanisms include safety wire, cotter pins, and self-locking nuts. Of the three, safety wire is the most reliable for securing engine components and accessories including oil filters. It keeps nuts and bolts on various aircraft hardware from disengaging over time due to vibration. Safety lock wire also secures aircraft propellor bolts and brake calipers.
In a nutshell, positive locking of aircraft components with safety wire ensures that the fasteners remain in the torque they are set. In fact, one of the routine tasks of an aircraft mechanic is to check that every fastener is wire locked properly and that the safety wire used is the correct size. The common sizes for aircraft safety wire are 0.032 inch and 0.041 inch. Anything smaller or larger might not do the job effectively.
Motorsport safety locking
The use of lock wire is not limited to airplanes and jets. It is also common in motorsport for securing critical parts such as engine head bolts and brake calipers. You can also lock any other component or accessory that you fear might come loose due to vibration. This includes the oil filter, oil plug, and even parts of the chassis.
Racing bikes and dirt bikes are also not left behind in safety wiring. Because of the intense vibration they experience in extreme sports, you may want to secure some of their parts before you hit the track or streets. Some of the parts you can safety wire include the oil filter, drain plug, and oil fill cap. You can also safety lock body parts, engine bolts, and other accessories to keep them from coming loose, falling off, or flying at you while racing. You can also secure aftermarket handle bar grips with a safety wire to keep them from slipping or coming off.
Another type of motorsport where lock wiring of components is important is kart racing. As a safety requirement, you must safety lock specific fasteners on your go-kart to participate in the sport. This includes the master cylinder bolts, caliper bolts, brake rotor bolts, and tie rod ends among others. If you like also, you can wire tie the front and rear bumpers to the frame to keep them from falling off and demobilizing the kart.

Making custom hose clamps
Safety wire makes very good inexpensive DIY hose clamps that can withstand adverse conditions that regular clamps or cable ties cannot. It also gives you the freedom to fabricate with your clamptite tool a wide range of clamp sizes for use where space, cost, and weight matter.
DIY uses
Besides locking mechanical parts, safety wire has many other unconventional uses. From making jewelry, securing wire fences to posts, and hanging things for powder coating to name just but a few. The wire provides the ductility, strength, and reliability you need for almost any application. Artists use it to make wire sculpturing among other hobby projects.
Frequently Asked Questions
Lockwire is not the same as seal wire despite both of them being twisted during installation. Lockwire secures fasteners and objects and is usually tensioned whereas seal wire is for sealing enclosures and helps tell when something is broken or tampered with. Furthermore, sealing wire is often made from soft metal such as copper, brass, or aluminum whereas safety wire is made of stainless steel.
One of the precautions when cutting safety wire is to wear goggles to protect your eyes from wire clippings that may fly to your face. Another important precaution is to always pigtail twisted lockwire after cutting it so that the sharp end doesn’t catch someone and cause injuries.
As a rule of thumb, a good safety wire job requires 6 – 8 twists per inch. Anything more than that will put excess tension on the wire and may cause it to break while fewer twists might not create enough tension.
Lock wire is a synonym for safety wire. They mean the same thing. The special stainless steel wire is called safety wire because it secures fasteners to increase safety. It is also called lock wire because it locks the fasteners in place so that they don’t come loose.